Monday, August 19, 2013

SinfulShine I'm Blushing & Amazonian

As you know, I'm a big fan of SinfulColors - they have a wide range of shades, tons of new collections, and a wallet friendly price.  This year, SinfulColors launched their new SinfulShine line, which is being exclusively sold at Walgreen's.


I wanted to try out two SinfulShine shades that were completely different from each other, so I went with a work appropriate creme and a vampy, fall-ready shimmer.

SinfulColors describes I'm Blushing as a light pink. Their description is straightforward and accurate. I'm Blushing is the lightest of ballet pinks with a creme finish. I wasn't expecting this shade to be so opaque! I'm Blushing was on the thicker side, but went on smoothly and was nearly opaque in one coat. I used two coats for this mani.

Sunlight
Indirect Light

Not only did I'm Blushing go on smoothly, I swear it self-leveled itself even more as it dried. The pictures above were taken without top coat. This is definitely a shiny polish. Due to its opacity, I'm Blushing might be a tad stark on me to be work appropriate if I was in a conservative office, but I think it would be perfectly fine in a more casual office setting or a paler skin tone.

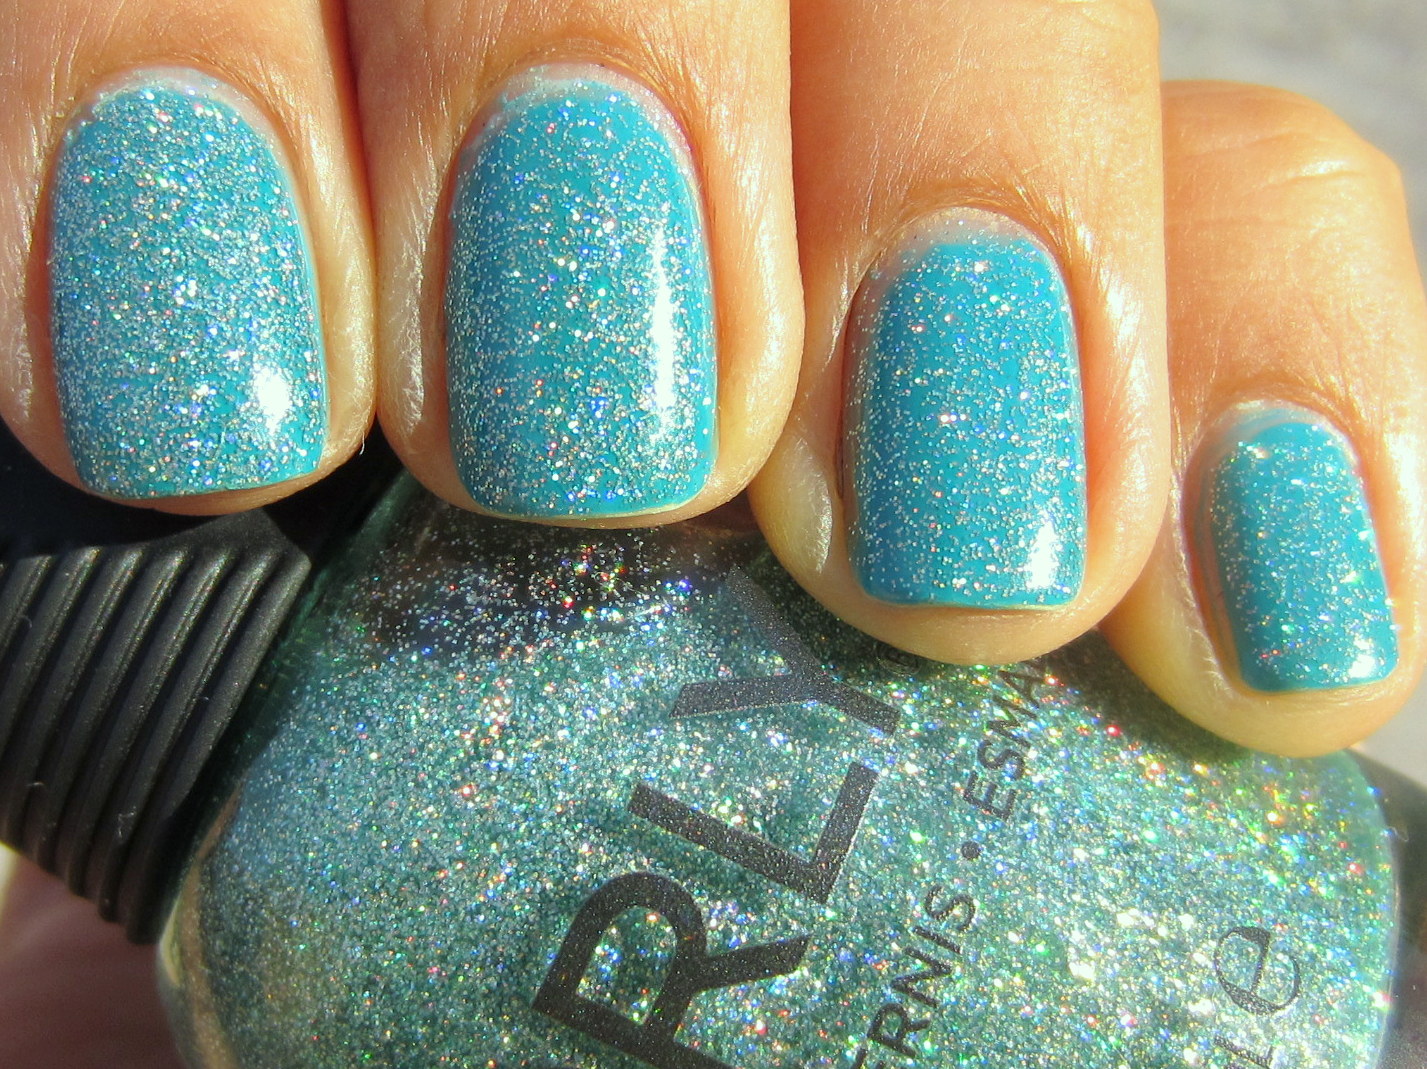
I also tried out Amazonian, a sparkly jungle green.  This shade's formula was even easier to work with, but I still used two coats. Here's Amazonian with no top coat.


Amazonian is ridiculously pretty! It's dark, it's green, it's so shimmery!! Since Pantone made Emerald the color of 2013, I've been working on trying out more green polishes. I'm ok with them, but only a few truly make me stop and go whoa - like Nars Zulu, China Glaze Emerald Sparkle, and Zoya Ivanka. Amazonian has made that short list with its shimmer's depth and sparkle.

While these SinfulShine polishes dry on the faster side of average and they do have glossy finishes, I don't recommend skipping a top coat. I'm rough on my nails with typing and dishes, and I got tipwear on the first day with these manis. I suggest putting a top coat on to seal and protect if you want to wear these polishes for more than a day - which you're definitely going to want to do with Amazonian!

Pin It!

Sunday, August 18, 2013

SinfulColors Savage + Orly Sparkling Garbage

Matte polishes are sneaky. Some times they're labeled, some times they're expected because they're in a matte collection, other times it's a complete surprise. It happens most often with bright colors that don't look neon in the bottle, but must have neon pigment in their formula because they dry matte.

And then you have SinfulColors Savage. Looks like a blue on the darker, greener side of teal in the bottle. Then you start applying it and something about the application seems off. It's really opaque but a little thin, a little streaky. It dries and bam! It's a matte?! Yep, even though Savage is an older shade from the core collection, I didn't know this when I bought it.

With a top coat, it's beautifully glossy and shiny. Unfortunately, I hadn't prepped myself or my nails for matte application which requires slightly more effort. I ended up with a few thin spots and ripples where I didn't pay enough attention.

Two coats of Savage + Shiny Top Coat - mani's not bad, but it's not great

I picked up a pretty holographic topper for about two bucks at the most recent Sally's Clearance sale, so I put it on to hide the flaws.

This is Orly Sparkling Garbage from their 2013 Summer Mash Up collection.  This is a very sheer holographic glitter in a dark seafoam green base. I put two coats on over Savage to pump up the rainbow effect. Sparkling Garbage had a very fine grit to it, so I used two coats of top coat for extra glossiness and smoothness.


Here it is all blurry, so you can see the sparkly rainbow effect. This is much closer to this mani sparkled in real life than the pictures above. 

I'm really happy with this layering, which is good because I was low on time to do polish changes this week and this mani wore like iron! I didn't get tip wear until Day 5! I'm not sure if it was the base coat, Savage, Sparkling Garbage, the top coat, or the combination of them all that made it so magically long lasting, but it was incredible.

Only downside was the terrible staining from Savage during removal. Even letting the remover soak on the nail for a few seconds and pulling it all down in one swipe to minimize cuticle staining, I was still left with blue cuticles and nails. I haven't had any staining like this from any of my recent SinfulColors blues, so I don't know what made this shade so stain-crazy.

Pin It!

Wednesday, August 7, 2013

China Glaze Grafitti Glitter & Mosiac Madness

Before I head on over to Sally's for their Clearance Sale this weekend, I thought I'd try out two of the polishes I got from their last sale.

Mosiac Madness & Graffiti Glitter

Both of these polishes are from the China Glaze Winter 2013 Glitz Bitz 'n Pieces collection. They're microglitter, hex glitter, and bar glitter combinations in clear bases. It's ridiculous how easy the application is with these polishes given how much glitter is packed into each bottle.

Graffiti Glitter is the green of the collection. The tiny round, small hexes, and large hexes all come in a vibrant emerald green and black. The largest of the hex glitter and the bar glitter are black. Here is one coat layered over China Glaze For Audrey.


Mosiac Madness is the sapphire blue version of Graffiti Glitter. There's blue and black round, small hex, and medium hex glitters with black bar glitter.  Here is one coat layered over China Glaze Lemon Fizz.

Ott Light
Indirect Sunlight

I don't know why I didn't play with these glitters sooner!  They were so easy to use and the layering combinations are endless. No dabbing, pulling, or placing - just load up the brush, swipe, and done. I can't wait to try them over raspberry pink, mint green, or a dove gray!!

Pin It!

Monday, July 15, 2013

My Birthday Mani

As with almost every major celebration-type event, I spend the day running around getting things ready and leave my nails to the last minute. This isn't always a bad thing because it means that I can't go back and forth over which polish to pick - I just have to be decisive and go for it!

I did it again yesterday - it was my birthday and I had 15 minutes to get my nails done so we could get to my parents' house on time. 

What mani to go with? Time for a glitter sandwich with OPI Funny Bunny! It's a nice clean white jelly, which is perfect for the middle of summer. I layered it with my favorite version of Lippmann's Happy Birthday knockoffs - Confetti Tazmanian Devil. The fine silver glitter that makes this version different than the rest gives it an extra delicate and pretty look.

Here's a coat of Funny Bunny, one coat of Tazmanian Devil, and a second coat of Funny Bunny all over Essie's Fill the Gap! ridge filling base coat (to guarantee extra smooth, streak-free application) and topped with Seche Vite so we could get out the door as quick as possible.


I added an extra coat of Tazmanian Devil on my thumbs so they could be full-on, blingy glitter.


Simple, straightforward, and looked just like the sprinkles on my birthday ice cream cake!


Pin It!

Saturday, June 22, 2013

Sharing Saturday: My Favorite Disappeared Bloggers

Much like the newest trends and collections they review, polish blogs come and go in the blink of an eye.

As someone who doesn't post as regularly as she should, I know that my love of polish is just as strong now as it ever was, but it's hard to get back in the game after a break. How many new polishes does a person miss in a few months? Will anyone come back to read and comment on my posts if I don't have the latest and greatest to show off? In a world that moves so fast, it's easy to understand why bloggers go missing.

Some bloggers, though, like me, All Lacquered Up, and The Polish Addict, have taken a break, and returned to their blogs to share their polish passion.

I'd like to share three polish bloggers that rocked my world before they vanished into the internet ether.

MeganChair from Little Music Boxes
Source: Polish or Perish

MeganChair wasn't the first person to take a brush and acetone to fix the edges of a messy manicure, but her tutorial was so detailed and straightforward that it became a gold standard.  This method is still referred to as The MeganChair Clean-Up Tutorial.  Seriously.  You can Google it like that!


She also wasn't the first person to ever play with accent nails, but she is the one who brought the glitter accent nail into my world. Sure, accent nails are everywhere now but they weren't mainstream back then. I loved glitter polish and to just use it on a ring finger or thumb was inspirational!

MeganChair shut down her blog, Little Music Boxes, when she needed to make time to start a family. She showed up on Polish or Perish for awhile, but ended up disappearing from there, too.  Fortunately, a few of her posts, pictures, and famous clean up tutorial still live on there for future polish fanatics to reference and enjoy.

Erika from Chloe's Nails
Source: Chloe's Nails

The Queen of the Scotch Tape Manicure. The Diva of Funky Frenches. Erika was the master of these nail art techniques. When her pictures pop up on the Stylish Eve Facebook feed without credit, I just want to jump up and down on those posts telling everyone to go to her blog to fully appreciate her nails.

Named after her daughter, Erika's blog, Chloe's Nails, had swatches of new polishes, but it also featured the many uses of scotch tape in nail art designs from French tips to rays to flames. She was nice enough to write up several tutorials, including one for the mani shown above.

She's been gone from her blog for a little over a year now, but all of the content is still there for people to learn from and admire.

Polish Hoarder from Polish Hoarder Disorder

Polish Hoarder was funny (read her explanation of the PHD symptoms) and artistic. She used a mirror to reflect her nails, she featured the polish bottle in open, unfocused fingers, she showed off her mani on both hands crossed.  Polish Hoarder's playful photography and distinctive poses quickly made her nails recognizable.

As her blog gained popularity, she fostered the good feeling of community by hosting weekly nail challenges where she would post participants' submissions in a photo gallery. Anyone that encourages community over cattiness in the polish world gets an A+ in Awesomeness from me!

This only scratches the surface of polish people that I miss reading. The long list includes Dr. Frankenpolish, the girls from The Edge of Sanity, Lacquer Lainee-PolishBlog, and Get Nailed, to just name a few.  However, if someone told me to start a "Where Are They Now?" series of disappeared bloggers and magically gave me the means to find them, these three are the girls I'd track down first! Where'd they go? How are they doing? And, of course, what polish are they wearing now?

Pin It!

Saturday, April 13, 2013

Color Club Otherworldly

As our weather gets warmer, I'm in the mood for colors that are brighter but not quite neon. Today I pulled out an oldie but goodie collection - the Color Club Starry Temptress from Summer 2011. This was a set of neon glitters, but some of the colors were more intensely neon than the others. I pulled out Otherworldly, a bright blue with silver, slightly holographic glitter.


This dried matte so this definitely has neon qualities, but this is not an eye-searingly intense neon. I used two thin coats for this mani, which was opaque for the casual eye but I can see some translucency in this close up shot.

This polish is packed with glitter that stays on top of the blue base, but this glitter doesn't sparkle.  A shiny top coat takes Otherworldly from matte to shiny, but not sparkly. The matte glitter gives this polish a speckled look on the nail - this shade reminded me of the mosaic floor on the bottom of a pool. This is also a very smooth glitter.  Being ultra smooth with the matte glitter made this mani look like it was done with nail polish strips.

Otherworldly was nice and long-wearing, which made the removal extra sad because it was such a hassle!! All the glitter that you can see in the bottle is there on the nail when you're trying to take this polish off.  Once the top layer of blue came off, there was nothing but tons and tons of silver holographic glitter stuck on underneath.  It took patience and acetone to get all the glitter off - lots of patience and acetone.

I still love Otherworldly because it's so cool looking on the nail, but I'll probably be smarter next time I'm wearing a polish from the Starry Temptress collection and use a glue base coat to make the removal easier.

Pin It!

Monday, March 25, 2013

Claire's Dream Catcher & A Winner!

I wanted to do a cute St. Patrick's Day mani. I was going back and forth in my head between ombre or gradient. Since I didn't think any of my greens leant themselves to a nice festive ombre (I could have done murky and/or olive-y) and I wanted to get to bed sooner than later, I skipped the gradient and went with a straightforward oldie but goody.

Claire's Dream Catcher started showing up in the blogosphere in 2010 and really gained a lot of steam when people noticed it was a dupe-ish cousin to Chanel Jade. Dream Catcher is a yellow-toned mint green with a fine blue shimmer. After quite vigorous shaking (and subsequent resting) to dissolve tiny chunks that had formed in my bottle, this polish went back to its old thin self and went on in three coats.


Dream Catcher is still one of my favorite light greens because of that blue shimmer. It might take three coats to get everything smooth and streak-free, but it dries fast and gets decent wear, so it's all good.

I hope everyone is having a happy Friday, especially the winner of the Sinful Colors giveaway.... April G.! Thanks to everyone who entered. I appreciate your participation and I loved reading what your favorite polishes of 2013 have been so far!!

Pin It!